5 Essential Handstand Drills for Beginners
Achieving a handstand is a rewarding fitness goal, building strength, balance, and coordination. This guide introduces five fundamental drills perfect for beginners, focusing on safe progression and proper technique. We'll explore wrist conditioning, core engagement, shoulder activation, and balance drills, plus recommend some helpful equipment to accelerate your handstand journey. Let's get upside down!
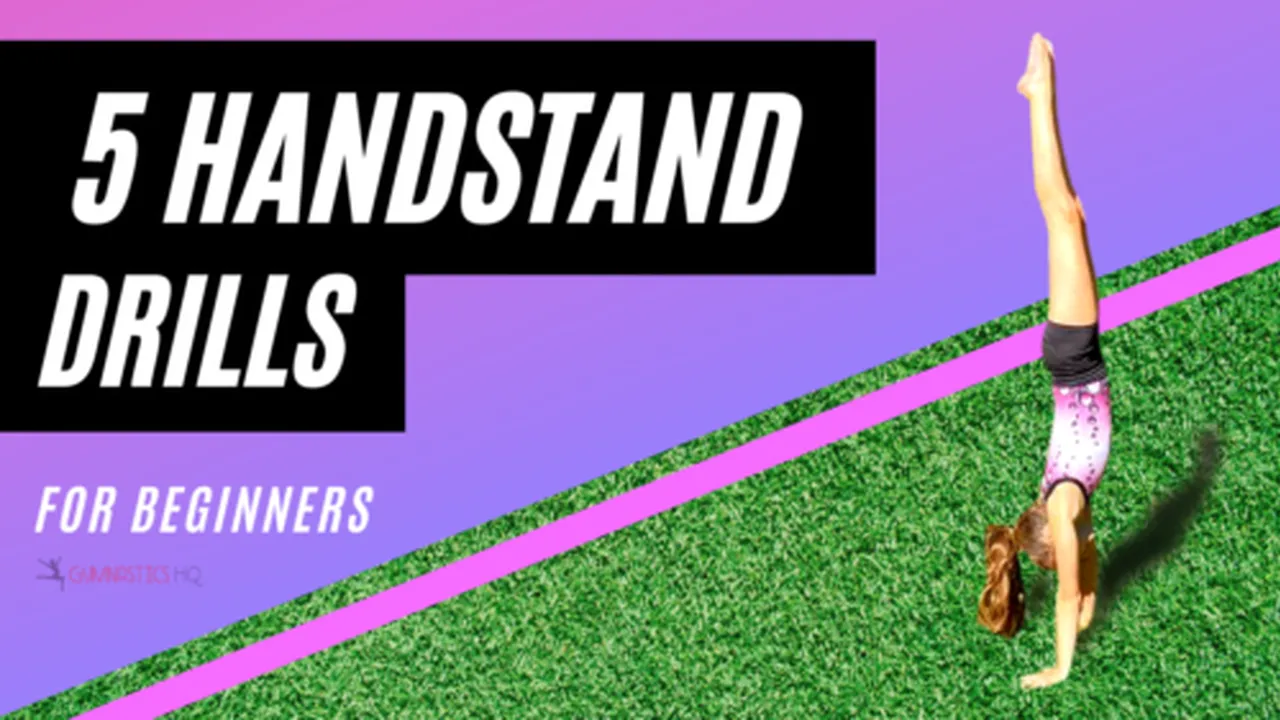
So, you want to learn to handstand? Awesome! It's a fantastic skill that looks impressive and feels even better. But let's be real, kicking up and hoping for the best isn't the most effective (or safest) way to learn. These five drills are your building blocks to a solid, controlled handstand. We'll break down each drill, explain why it's important, and give you some tips to nail it.
Wrist Conditioning for Handstand Beginners: Building a Solid Foundation
Your wrists are going to be doing a lot of work in a handstand, so we need to get them strong and flexible. Think of them as the foundation of your upside-down house! Without a strong foundation, the house (your handstand) will crumble. These drills will help prepare your wrists for the demands of holding your bodyweight.
Wrist Circles: A Gentle Warm-Up
Start on your hands and knees. Slowly rotate your wrists in a circular motion, first clockwise, then counter-clockwise. Do this for about 30 seconds in each direction. This increases blood flow and lubrication in the wrist joint.
Wrist Flexion and Extension: Increasing Range of Motion
Again, on your hands and knees, gently rock forward and backward, feeling a stretch in the front and back of your wrists. Repeat this for 15-20 repetitions. This improves the range of motion in your wrists, making them more resilient.
Finger Spreads: Engaging the Hand Muscles
On your hands and knees, spread your fingers wide and press firmly into the ground. This engages the muscles in your hands and forearms, which will help you grip the floor and maintain stability. Hold for 30 seconds, repeat 3 times.
Core Engagement Drills for Handstand Mastery: The Key to Stability
A strong core is essential for a stable handstand. Think of your core as the central pillar holding everything together. These drills will help you learn how to engage your core muscles properly, preventing excessive arching in your back and maintaining a straight line from head to heels.
Hollow Body Holds: The Foundation of Core Strength
Lie on your back with your arms extended overhead and your legs straight. Engage your core and lift your shoulders and legs slightly off the ground, creating a "hollow" shape. Hold for 15-30 seconds, repeat 3-5 times. This drill teaches you how to maintain a neutral spine and engage your core muscles.
Plank Variations: Building Endurance and Stability
Start in a plank position, with your forearms on the ground and your body in a straight line. Hold for 30-60 seconds. Progress to forearm planks, then to high planks (on your hands). You can also add variations like plank taps (alternating tapping your shoulders) or plank jacks (jumping your feet out and in). Planks build endurance and stability in your core, which is crucial for holding a handstand.
Dead Bugs: Core Control and Coordination
Lie on your back with your knees bent at 90 degrees and your arms extended towards the ceiling. Lower one arm and the opposite leg towards the ground simultaneously, keeping your core engaged and your lower back pressed against the floor. Repeat on the other side. This drill improves core control and coordination, which is important for maintaining balance in a handstand.
Shoulder Activation Exercises for Handstand Success: Powering Your Inversion
Active shoulders are vital for a strong and stable handstand. We need to be able to push through the shoulders to create space and prevent collapsing. These drills will help you activate your shoulder muscles and improve your overhead strength.
Scapular Push-Ups: Understanding Shoulder Protraction
Start in a plank position. Without bending your elbows, push your chest away from the floor by protracting your shoulder blades (rounding your upper back). Then, retract your shoulder blades (pinching them together) to lower your chest slightly. This drill teaches you how to protract your shoulders, which is essential for pushing up into a handstand.
Wall Slides: Improving Overhead Mobility
Stand with your back against a wall, your feet a few inches away from the wall. Bend your elbows at 90 degrees and press your forearms against the wall. Slowly slide your arms up the wall, keeping your forearms in contact with the wall as much as possible. This drill improves overhead mobility and helps you maintain proper shoulder alignment.
Band Pull-Aparts: Strengthening the Upper Back
Hold a resistance band with your arms extended in front of you. Keeping your elbows straight, pull the band apart, squeezing your shoulder blades together. This drill strengthens the muscles in your upper back, which helps stabilize your shoulders and improve your posture.
Balance Drills for Handstand Beginners: Finding Your Center
Balance is the name of the game in handstands! These drills will help you develop the proprioception (awareness of your body in space) and control needed to stay upside down.
Wall Walks: Gradual Progression to Inversion
Start facing a wall in a plank position, with your feet against the wall. Walk your feet up the wall and your hands closer to the wall until you are in a vertical position. Hold for as long as you can maintain good form. This drill helps you get comfortable being upside down and develop your balance.
Belly to Wall Handstand Holds: Building Confidence and Control
Place your hands on the floor about a foot away from a wall. Kick up one leg towards the wall and bring the other leg up to meet it. Your belly should be facing the wall. Focus on pushing through your shoulders and maintaining a straight line from head to heels. This drill helps you build confidence and control in a handstand position.
Handstand Kicks Ups: Practicing the Entry
Practice kicking up to a handstand position against a wall. Focus on using controlled momentum and engaging your core. Don't just throw yourself up there! Think about squeezing your legs together and pointing your toes. This drill helps you refine your technique and build the strength and coordination needed to kick up into a handstand safely.
Recommended Equipment for Handstand Training: Gear Up for Success
While you don't *need* any fancy equipment to learn to handstand, some tools can definitely help you progress faster and more safely. Here are a few recommendations, along with their uses, comparisons, and price ranges.
Yoga Mat: The Essential Foundation
A good yoga mat is essential for any floor-based exercise. It provides cushioning and grip, preventing you from slipping and sliding. Look for a mat that is at least 4mm thick and made from a non-slip material. Brands like Manduka and Lululemon offer high-quality mats, but there are also plenty of affordable options available on Amazon.
- Use: Provides cushioning and grip during wrist conditioning and other floor exercises.
- Comparison: Thicker mats offer more cushioning but can be less stable. Thinner mats provide more stability but less cushioning.
- Price: $20 - $150+
Handstand Blocks: Enhancing Wrist Comfort and Stability
Handstand blocks are small wooden or cork blocks that you can place your hands on during a handstand. They can help reduce wrist strain and improve your grip, especially if you have wrist pain or limited wrist flexibility.
- Use: Reduces wrist strain, improves grip, and provides a more stable base.
- Comparison: Wooden blocks are more durable and stable than cork blocks, but cork blocks are more comfortable.
- Price: $30 - $80 per pair
Resistance Bands: Warming Up and Strengthening
Resistance bands are versatile tools that can be used for a variety of exercises, including wrist conditioning, shoulder activation, and core strengthening. They are also great for warming up your muscles before a handstand practice.
- Use: Warming up muscles, strengthening shoulders and core.
- Comparison: Different resistance levels provide varying levels of challenge.
- Price: $10 - $30 per set
Foam Roller: Muscle Recovery and Flexibility
Foam rolling can help release muscle tension and improve flexibility, which is important for preventing injuries and improving your handstand performance. Focus on rolling out your wrists, forearms, shoulders, and back.
- Use: Releasing muscle tension and improving flexibility.
- Comparison: Different textures and densities provide varying levels of massage intensity.
- Price: $15 - $50
Learning to handstand takes time, patience, and consistent practice. Don't get discouraged if you don't see results right away. Just keep practicing these drills regularly, and you'll be upside down in no time! Remember to listen to your body and take breaks when you need them. And most importantly, have fun!
:max_bytes(150000):strip_icc()/277019-baked-pork-chops-with-cream-of-mushroom-soup-DDMFS-beauty-4x3-BG-7505-5762b731cf30447d9cbbbbbf387beafa.jpg)