Pull-Ups for Beginners: A Progressive Training Plan
Pull-ups, they seem simple, right? Just grab the bar and pull yourself up. But for beginners, it's often a daunting challenge. This guide breaks down the journey to your first pull-up, offering a progressive training plan, gear recommendations, and tips to conquer this awesome feat of strength. Let's ditch the frustration and embrace the power of pull-ups!
Understanding the Pull-Up A Foundational Strength Exercise
Let's face it, the pull-up is a king amongst bodyweight exercises. It targets a whole host of muscles, primarily working your lats, biceps, traps, and even your core. Mastering the pull-up isn't just about bragging rights; it's about building serious upper body strength and improving overall fitness. Many beginners struggle with pull-ups because they lack the prerequisite strength or proper technique. This article addresses both, providing a structured approach to achieving your first pull-up.
Assessing Your Current Strength Level Pull-Up Readiness
Before diving into the training plan, it's crucial to assess your current fitness level. Can you hang from a bar for 30 seconds? Can you perform a few negative pull-ups (lowering yourself slowly)? If not, that's perfectly okay! We'll start with exercises to build foundational strength. If you can already do a few negative pull-ups, you're one step closer to achieving a full pull-up. Honest self-assessment is key to avoiding injury and maximizing progress.
Phase 1 Building a Solid Foundation The Importance of Grip Strength
This phase focuses on building the necessary strength and stability. We'll target the muscles used in pull-ups through a series of accessory exercises. Remember, consistency is crucial. Aim for 3-4 workouts per week, with rest days in between. Don't rush the process. Proper form is always more important than the number of reps.
Hanging Holds Grip Strength Training
Simply hanging from the pull-up bar is a fantastic way to build grip strength and acclimate your body to the exercise. Start with 3 sets, holding for as long as possible, aiming for at least 30 seconds each set. Rest for 60 seconds between sets. If you find it too easy, try using a thicker bar or adding weight.
Inverted Rows Building Back Strength
Inverted rows are a great way to build back strength in a horizontal pulling motion, mimicking the muscles used in pull-ups. Set up a barbell in a squat rack or use a Smith machine. Lie underneath the bar and grab it with an overhand grip, slightly wider than shoulder-width. Pull your chest towards the bar, keeping your body in a straight line. Lower yourself slowly back to the starting position. Aim for 3 sets of 8-12 repetitions.
Bicep Curls Strengthening Your Arms
While pull-ups primarily target the back, biceps play a supporting role. Incorporate bicep curls into your routine to strengthen these muscles. Use dumbbells or a barbell, and focus on controlled movements. Aim for 3 sets of 10-15 repetitions.
Lat Pulldowns Targeting Latissimus Dorsi
The lat pulldown machine mimics the pull-up motion and allows you to adjust the weight to your current strength level. Focus on pulling the bar down to your chest, squeezing your shoulder blades together. Aim for 3 sets of 8-12 repetitions.
Phase 2 Negative Pull-Ups Mastering the Descent
Negative pull-ups are a crucial step in progressing towards a full pull-up. They involve focusing on the eccentric (lowering) portion of the exercise, which is often easier than the concentric (pulling) portion. Use a box or bench to get yourself into the top position of a pull-up (chin over the bar). Then, slowly lower yourself down, controlling the descent as much as possible. Aim for 3 sets of as many repetitions as possible (AMRAP), focusing on a slow and controlled descent of at least 5 seconds per rep. Rest for 90 seconds between sets.
Phase 3 Assisted Pull-Ups Using Resistance Bands
Assisted pull-ups use resistance bands to provide assistance, making the exercise easier and allowing you to perform more repetitions. Loop a resistance band around the pull-up bar and place one or both feet in the loop. The band will provide upward assistance, reducing the amount of weight you need to pull. Experiment with different band thicknesses to find the right level of assistance. Aim for 3 sets of 8-12 repetitions.
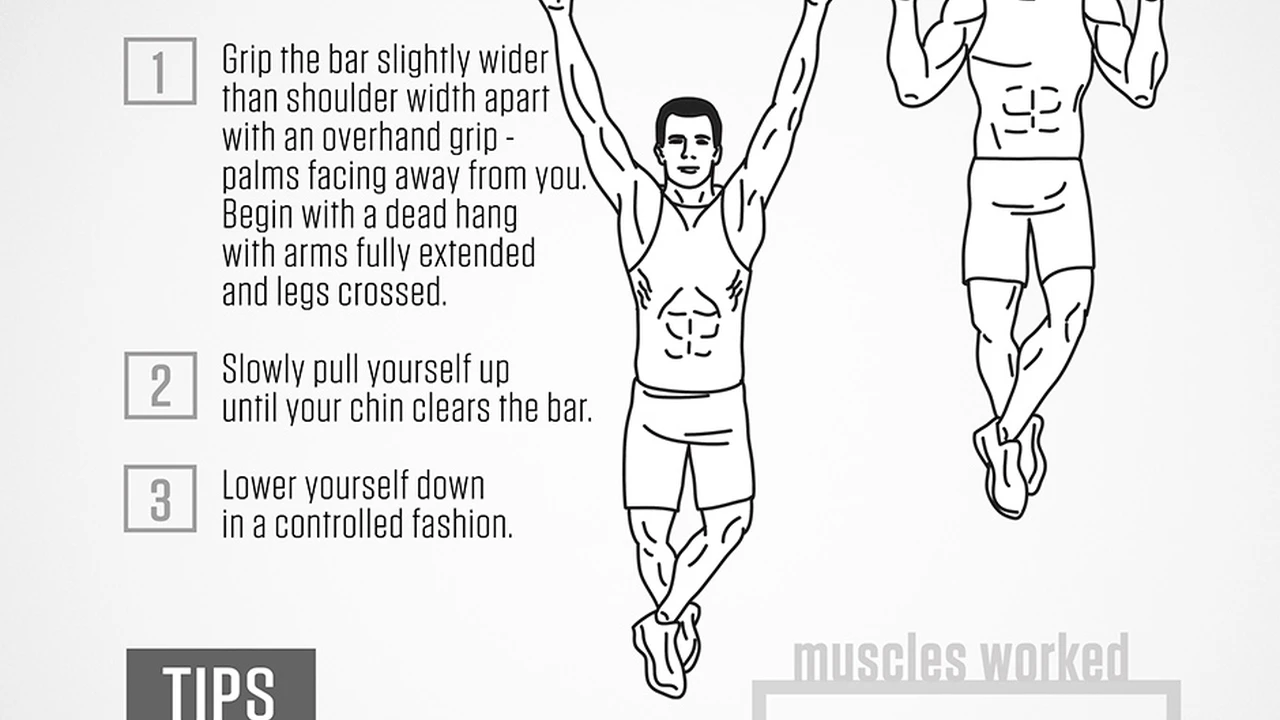
Phase 4 The Real Deal Attempting Your First Pull-Up
After consistently working through the previous phases, you should be ready to attempt your first pull-up! Find a pull-up bar, grip it with an overhand grip, slightly wider than shoulder-width. Hang freely, then engage your core and pull yourself up until your chin is over the bar. Lower yourself slowly back to the starting position. Even if you can only do one pull-up, that's a huge accomplishment! Celebrate your progress and continue to work on increasing your repetitions.
Pull-Up Bar Recommendations Choosing the Right Equipment
Having the right equipment can make a big difference in your pull-up training. Here are a few recommended pull-up bars:
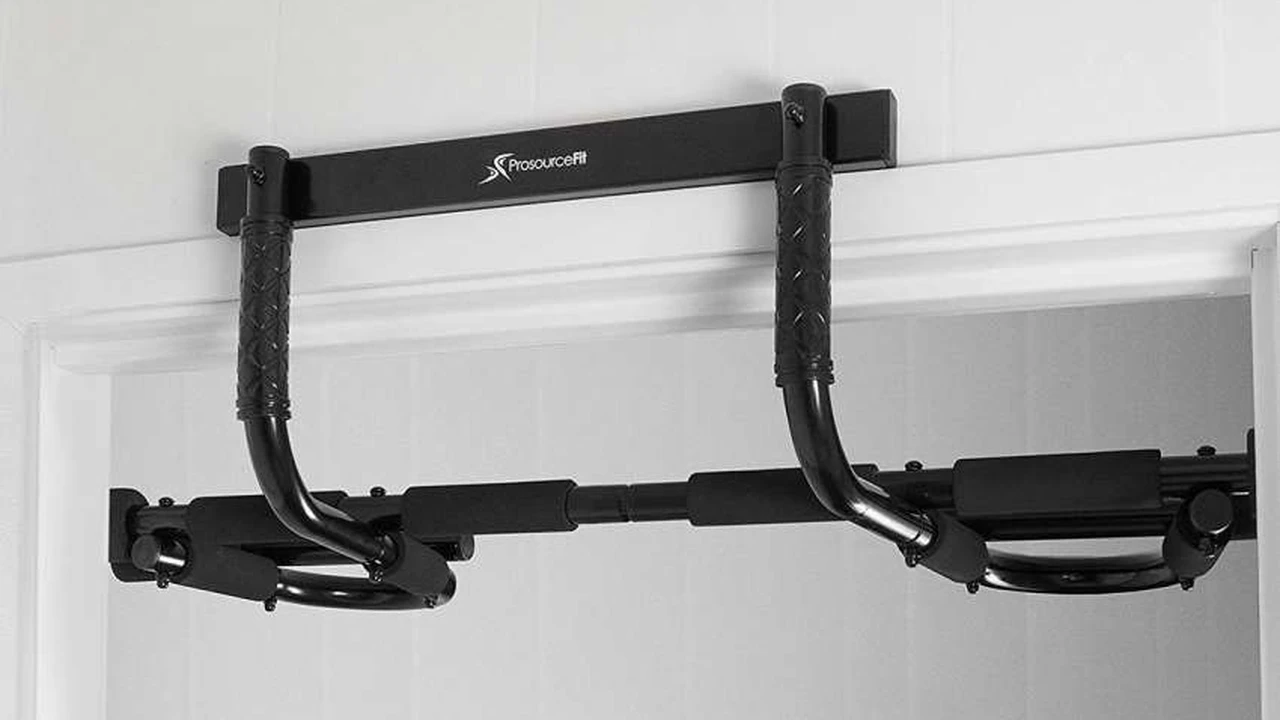
Doorway Pull-Up Bar Affordable and Convenient
Doorway pull-up bars are a popular choice for home gyms because they're affordable and easy to install. They typically hook onto your doorframe, providing a sturdy and secure platform for pull-ups. However, be sure to check the weight capacity of the bar and ensure that your doorframe is strong enough to support your weight. Examples include the Iron Gym Total Upper Body Workout Bar (around $30) and the ProsourceFit Multi-Grip Lite Pull-Up/Chin-Up Bar (around $25). These are best for standard doorway sizes and are used for basic pull-up and chin-up exercises. They are less versatile than other options but great for beginners on a budget.
Wall-Mounted Pull-Up Bar Secure and Sturdy
Wall-mounted pull-up bars offer a more permanent and stable solution. They're typically bolted directly to your wall, providing a secure platform for heavier users and more advanced exercises. However, installation requires some drilling and may not be suitable for renters. Look for models with multiple grip options for added versatility. Prices range from $50 to $150 depending on the features and brand. Brands like Rogue Fitness and Titan Fitness offer robust options. These are ideal for dedicated home gyms where you want a stable and long-lasting pull-up solution. They often allow for kipping and other advanced movements.
Power Tower Versatile and Multi-Functional
Power towers are a versatile option that combines a pull-up bar with other exercise stations, such as dip bars and vertical knee raise stations. They're a great choice for those looking to get a full-body workout in a compact space. However, they can be more expensive than other options and may take up more room. Expect to pay between $100 and $300 for a decent power tower. Popular brands include Weider and Body Champ. Power towers are best for those looking for a multi-functional piece of equipment for a full-body workout. They're a good option if you want to incorporate dips, leg raises, and other exercises into your routine.
Resistance Band Recommendations Enhancing Your Training
Resistance bands are an essential tool for assisted pull-ups and other exercises. Here are a few recommended resistance bands:
TheraBand Resistance Bands Versatile and Durable
TheraBand resistance bands are a popular choice for their versatility and durability. They come in a variety of resistance levels, allowing you to adjust the assistance as you progress. They can also be used for a wide range of other exercises, making them a great addition to any home gym. A set of TheraBand resistance bands typically costs between $20 and $50. These are great for general fitness and rehabilitation and are available in various resistance levels indicated by color. They are suitable for assisted pull-ups, stretching, and other exercises.
Rogue Fitness Resistance Bands High-Quality and Heavy-Duty
Rogue Fitness resistance bands are known for their high quality and heavy-duty construction. They're designed to withstand intense use and provide consistent resistance. They're a great choice for serious athletes and those looking for a durable and reliable resistance band. Individual bands range from $10 to $50 depending on the resistance level. Rogue Fitness bands are designed for serious athletes and offer high resistance levels. They are suitable for assisted pull-ups, powerlifting, and other strength training exercises.
WODFitters Pull-Up Assistance Bands Specific for Pull-Ups
WODFitters offers resistance bands specifically designed for pull-up assistance. These bands are wider and thicker than standard resistance bands, providing more support and assistance. They're a great choice for those who are specifically focused on mastering the pull-up. A set of WODFitters pull-up assistance bands typically costs between $30 and $70. These are specifically designed for pull-up assistance and offer a range of resistance levels. They are a good option if you're primarily focused on mastering the pull-up.
Comparing Pull-Up Bars and Resistance Bands Making the Right Choice
Choosing the right pull-up bar and resistance bands depends on your individual needs and preferences. Consider your budget, space constraints, and fitness goals when making your decision. Doorway pull-up bars are a good option for beginners on a budget, while wall-mounted pull-up bars offer a more stable and permanent solution. Power towers are a versatile option for those looking to get a full-body workout. TheraBand resistance bands are a good choice for general fitness, while Rogue Fitness resistance bands are designed for serious athletes. WODFitters pull-up assistance bands are specifically designed for pull-up assistance.
Proper Form and Technique Avoiding Injuries
Maintaining proper form and technique is crucial to avoid injuries and maximize results. Keep your core engaged throughout the exercise, and avoid swinging or using momentum to pull yourself up. Focus on controlled movements, and lower yourself slowly back to the starting position. If you're unsure about your form, consider working with a qualified personal trainer.
Progressive Overload Gradually Increasing Difficulty
Progressive overload is the key to continued progress. As you get stronger, gradually increase the difficulty of your workouts. This can be done by adding repetitions, sets, or weight. You can also try using a narrower grip, performing more challenging variations of pull-ups, or reducing the amount of assistance from resistance bands.
Nutrition and Recovery Fueling Your Body
Proper nutrition and recovery are essential for building muscle and improving strength. Make sure you're eating a balanced diet with plenty of protein, carbohydrates, and healthy fats. Get enough sleep, and allow your muscles time to recover between workouts. Consider incorporating protein shakes or other supplements to support muscle growth.
Staying Motivated Setting Goals and Tracking Progress
Staying motivated is crucial for long-term success. Set realistic goals, and track your progress over time. Celebrate your achievements, and don't get discouraged by setbacks. Find a workout buddy to keep you accountable, or join a fitness community for support and encouragement.
:max_bytes(150000):strip_icc()/277019-baked-pork-chops-with-cream-of-mushroom-soup-DDMFS-beauty-4x3-BG-7505-5762b731cf30447d9cbbbbbf387beafa.jpg)